Remix - Firestore Integration (Part 3)
- Part 1 - Getting started with Remix
- Part 2 - Adding Firebase Authentication
- Part 3 - Adding Firestore Access ← you are here
- Part 4 - Deploying to Google App Engine
- Bonus! Part 5 - Deploying to Vercel
Instructions to deploy a Remix application using Firebase and App Engine Vercel. I'll be using vanilla JavaScript, but feel free to implement your solution in TypeScript if you wish. Please also note, I won't be building a full application, but rather exploring the integration of Remix with Firebase as a means to an end. There will be plenty of undeveloped tasks for the reader to complete.
UPDATE (February 10th, 2022): I've created a starter project based on the initial exploration I did in this walkthrough series. You can find my more structured TypeScript implementation on GitHub: https://github.com/nathanhumphrey/remix-app. The repo README provides a high-level overview of the details, and the project comes with some sample impementations.
Install Firestore Emulator #
Welcome back! Let's jump right back into the build. In this session, we're going to add Firestore access to our application. For testing, let's install the local Firestore Emulator. Run the Firebase init script and you should be presented with the ability to add Firestore Emulator to the project (Authentication Emulator should already be selected).
npx firebase init emulators
Select Firestore Emulator, accept the default port and UI options, and download the emulators. You should see a progress bar showing the status of the Firestore Emulator download. You should find that the firebase.json file has been updated with an entry for firestore:
// firebase.json
{
  "emulators": {
    "auth": {
      "port": 9099
    },
    "ui": {
      "enabled": true
    },
    "firestore": {
      "port": 8080
    }
  }
}
updated firebase.json file
Once the download is complete, visit your Emulator UI and navigate to the Firestore tab:
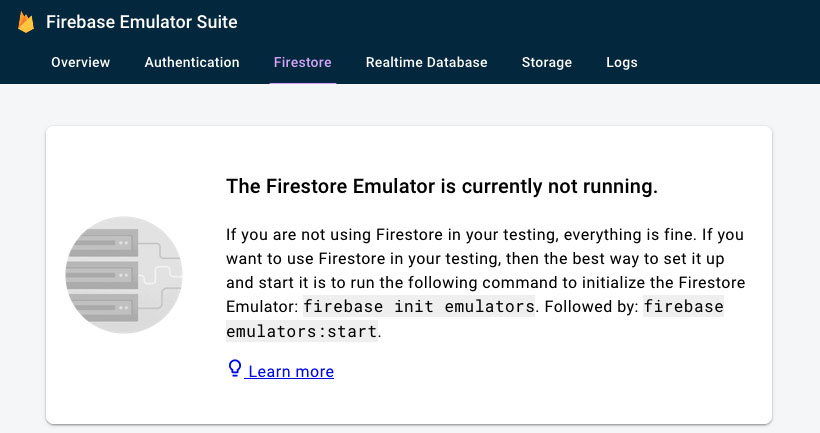
firestore emulator is not yet running
We haven't started the Emulator yet. If you're still running the Auth Emulator, kill the process and restart both Emulators:
npx firebase emulators:start --project development --only auth,firestore
Note: feel free to create additional scripts in your package.json file to make working with the emulators a little easier (e.g. export data, import data, etc.). You can find more information about working with the Firestore Emulator in the docs.
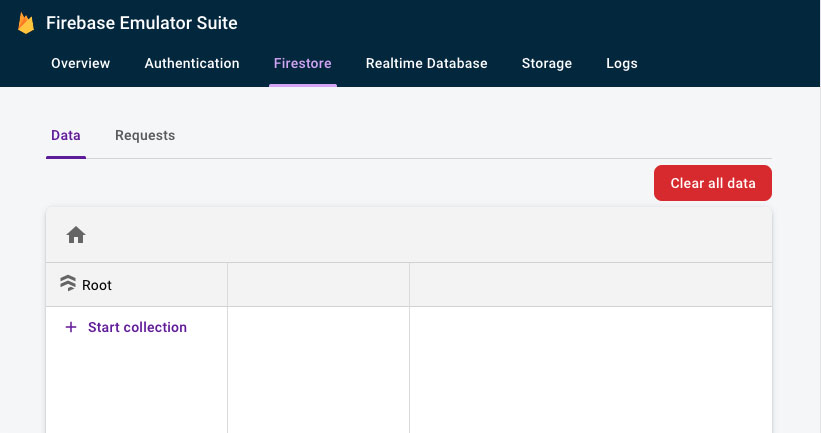
firestore emulator is running, accessible via UI
Great! Now Firestore is operational and we can begin integrating it with our app.
How to Access Firestore #
The next big decision to make is, where to execute the Firebase code? Should we run Firebase access code in loaders and actions (i.e. server-side) or run everything for Firebase on the client? Let's "quickly" explore each option. Before we begin, create a new secrets collection in Firestore, with a document that has a title and a body.
Note: the Firestore Emulator, by default, will treat all projects as having open rules. You will need to implement rules via the firebase.json file, which can point to local file that contains your Cloud Firestore Security Rules. You can find out more about Firebase Emulator and security rules in the docs. We'll update with some security rules a little later on.
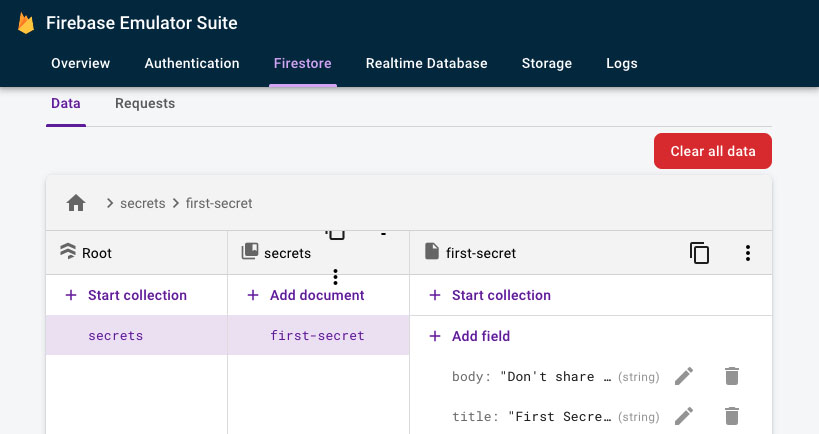
test firestore secrets collection
Firestore From the Server #
Export the FIRESTORE_EMULATOR_HOST environment variable so the Admin SDK will connect to the Emulator:
export FIRESTORE_EMULATOR_HOST=localhost:8080
Update firebase.js to export the Firestore db object:
// app/firebase.js
import {
  initializeApp,
  applicationDefault,
  getApps,
  getApp,
} from 'firebase-admin/app';
import { getAuth } from 'firebase-admin/auth';
import { getFirestore } from 'firebase-admin/firestore'; // new

let app;
let auth;
let db; // new

if (process.env.NODE_ENV === 'development') {
  app =
    getApps().length === 0
      ? initializeApp({ projectId: 'demo-remix-blog-10685' })
      : getApp();
  auth = getAuth();
  db = getFirestore(); // new
} else {
  app =
    getApps().length === 0
      ? initializeApp({ credential: applicationDefault() })
      : getApp();
  auth = getAuth();
  db = getFirestore(); // new
}
export { app, auth, db }; // new
update firebase.js to support firestore
Okay, we should now be able to access the Firestore Emulator from our server-side functions. Let's test this by attempting to retrieve the title for our "first secret" document. Open secrets.jsx and make the following udpates:
// app/routes/secrets.jsx
import { Form, useLoaderData } from 'remix';
import { requireUser } from '~/util/session.server';
import { db } from '~/firebase';

export const loader = async ({ request }) => {
  const user = await requireUser(request, '/');
  const secrets = await db.doc('secrets/first-secret');
  const snap = await secrets.get();

  return { user, data: snap.data() };
};

...

export default function Secrets() {
  const { user, data } = useLoaderData();

  return (
    <div className="remix__page">
      <main>
        <h2>Remix Secrets</h2>
        <p>
          Hello {user.name}, your {data.title} will appear here.
        </p>
        <Form method="post" action="/logout">
          <button>Logout</button>
        </Form>
      </main>
    </div>
  );
}
accessing firestore from the server-side
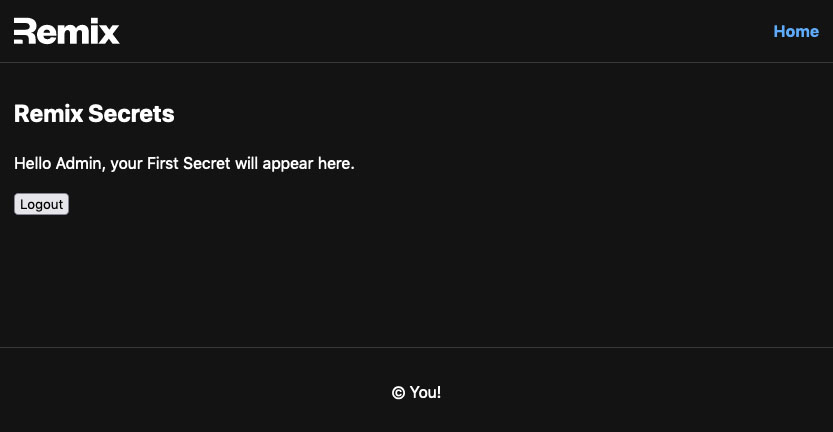
rendering firestore secrets document
And voilà! We have accessed Firestore and retreieved a document! We have direct access to the user (so we can grab the uid if necessary) and we can run any query or update against the database. One thing we haven't explored yet are the security rules. Let's do that now.
Implementing security rules #
One of the cool things about the Firestore Emulator is that you can test all your security rules against it, rather than on a live instance. When the Emulator starts, it will look for a rules property for firestore in the firebase.json file. First, we'll create a security rules file, and then we'll link to the Emulatory.
Create a new file firestore.rules in the project direcory. For testing purposes, we'll keep the security rules real simple. Begin with an open access policy, and then we can test more strict rules.
// firestore.rules
rules_version = '2';
service cloud.firestore {
    match /databases/{database}/documents {
        match /{document=**} {
            allow read, write: if true;
        }
    }
}
open access firestore security rules
With the rules file created, we can update firebase.json to link to the file:
// firebase.json
{
  "firestore": {
    "rules": "firestore.rules"
  },
  "emulators": {
    "auth": {
      "port": 9099
    },
    "ui": {
      "enabled": true
    },
    "firestore": {
      "port": 8080
    }
  }
}
configuring firebase to use firestore security rules
Now, to get the Emulator to load the rules, stop and restart the Firebase Emulators in the terminal. You should no longer see a warning aobut missing Cloud Firestore rules missing in the startup message.

rendering firestore secrets document
Now, when you update the firestore.rules file, you should see message from the Emulator that it is reloading the changed rules. Make the following simple update to the firestore.rules file and then check the Emulator terminal. The changes made below, the switching of true to false, will ensure that no client access can be made to the documents in the database.
// firestore.rules
rules_version = '2';
service cloud.firestore {
    match /databases/{database}/documents {
        match /{document=**} {
            allow read, write: if false;
        }
    }
}
rendering firestore secrets document
Now, this is all well and good, however when you connect to Firestore via the Admin SDK, all these security rules are bypassed. So, while you can set them (and you could create a JavaScript SDK access script to test them out), they won't have any effect on our server-side Admin SDK implementation. Moral of the story is, lock down your ddatabase and be careful about how you access the database using the Admin SDK method; it's up to you to determine the scope of access when using Admin SDK.
still rendering firestore secrets document, bypassing security
Summary #
There are a lot of additional tasks we could complete now that we have database access. I would recommend abstracting database access via some db provider and model (rather than directly accessing the db as we did in this exercise). From there, you could build the /secrets route out to display all secret titles as links to the complete data (e.g. nested routes). You can add a form to create new secrets or edit and delete existing secrets. The world is yours! In the next and final installment of this series, we'll look at how we can deploy this application to Google App Engine.
References #
- Firebase Firestore Emulator
https://firebase.google.com/docs/emulator-suite/connect_firestore - firebase-admin/firestore module
https://firebase.google.com/docs/reference/admin/node/firebase-admin.firestore - 7 Tips on Firebase Security Rules and the Admin SDK
https://firebase.googleblog.com/2019/03/firebase-security-rules-admin-sdk-tips.html